Зворыгин Игорь : другие произведения.

Как интегрировать Git с Visual Studio

Самиздат: [Регистрация] [Найти] [Рейтинги] [Обсуждения] [Новинки] [Обзоры] [Помощь|Техвопросы]
Ссылки:


 Ваша оценка:
  • Аннотация:
    На предпоследнем контаркте попросили составить инструкцию по интегрированию Git с Visual Studio - "чтоб через два часа была готова". Вот что получилось.


Visual Studio and Git integration

   Version: 0.5 from March 26, 2014; Author: Igor Zvorygin
   Contents


   Git Installation and Basics
   Installing Git on Windows
   Overview
      -- Install Git for Windows
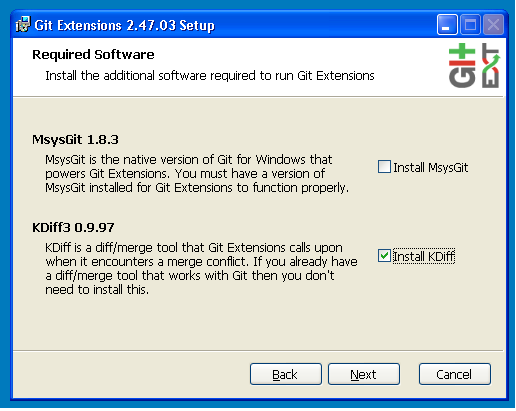
      -- Install Git Extensions. Actually, step above can be skipped if you use Git Extensions with embedded Git for Windows installer (You need two apps - Git for Windows and either Git Extensions or TortoiseGit. Git for Windows embedded in the Git Extensions installer is of older version). See Appendix for comparison of the tools.
      -- Run Visual Studio. Go to Tools | Extension Manager, search online gallery for "Git Source Control Provider", install and configure it.
      -- Configure Git Extensions add-in. 
  
   1. Installing Git for Windows is very easy - click on the link Git for Windows (If link above is not available, download the installer exe file from the GitHub page http://msysgit.github.com ), and run or save it.
   File that you download will be named something like: Git-1.9.0-preview20140217.exe
   Run executable and select all options suggested by default. After it's installed, you have both a command-line version (including an SSH client that will come in handy later) and the standard GUI.
  
   2. Install Git Extensions from the web page:
   http://visualstudiogallery.msdn.microsoft.com/8f594baa-e44e-4114-8381-e175ace0fe97
file will be named like: GitExtensions24703SetupComplete.msi. If you are not your PC admin, install for yourself only:
   msiexec /i GitExtensions24703SetupComplete.msi ALLUSER=""
  
Note, you can avoid step 1 and proceed directly to step 2 check-marking in it "Install MsysGit" option - the only difference is that it will be of the version that is slightly behind. In other words, if we already have "Git for Windows" installed, we don't need to check the "Install MsysGit" box as shown in the picture below (leave KDiff checked).
   0x01 graphic
   Test installation by running Git Extensions (All Programs -> Git Extensions). Expect screen like one below to appear:
0x01 graphic
   Select "Clone repository" link to create local repository on your machine that will be connected to the central (master) one which is on the network drive \\todnfs04.tsa.bmo.com\Group\NVaR\DSRconversion\DSR_Git . If you have \\todnfs04.tsa.bmo.com\Group mapped as F:, it becomes: F:\NVaR\DSRconversion\DSR_Git.
0x01 graphic

If central repository is on Linux, say at 10.193.12.23:7999/rcng/rcng.git and public key is set there:
•Open your Git extension
•Go to Tools->settings->SSH (under Git Extensions tree node):
  -- Click on Other ssh client, put your ssh path (probably C:\Program Files\Git\bin\ssh.exe)
  -- Make sure that the GIT_SSH environment variable is set to the mentioned path
   •Click on Clone repository, in `Repository to clone', set the url as ssh://git@10.193.12.23:7999/rcng/rcng.git
  
   You may be prompted to enter your id (like Igor.Zvorygin) and email plus your preferences at the following screen:
   0x01 graphic
   As part of the Repair process do the needed fixes - click button and add to the form that would open. For example, if during installation you installed `kdiff3' as part of it, you can pick it as a `diff' tool, or point to other tool like DiffMerge.
  
   3. Run Visual Studio, install "Git Source Control Provider" and configure interface to Git Extensions.
   Go to Tools | Extension Manager, search online gallery for "Git Source Control Provider". After VS Extension Manager suggests you to download "Git Source Control Provider", install and configure it. - see below
   (If you do not find this item anywhere, simply type "Git Source Control Provider" in search box at top right hand side)
0x01 graphic
and after you click on the button, redirects you to http://gitscc.codeplex.com/documentation page which means this part is done.
   Restart Visual Studio and go to Tools -> Options menu, Source Control item and select "Git Source Control Provider":
   0x01 graphic
   After that open window for Source Control Explorer (View -> Other Window -> ...) and configure your Git plug-in:
   0x01 graphic
   If you did not install kdiff3, checkmark `Use Visual Studio Diff Window' (diffmerge.exe).
   Note, there may be errors during installation or after - these tools are in Beta stage in terms of VS integration.
  
   4. Configure Git Extensions add-in (optional, may not work)
   After you installed VS and Git Extensions, go to Tools->Add-ins Manager in VS and check the Git Extensions box. To allow Add-in manager accept your change, you have to add the loadFromRemoteSources element to the
   "C:\Program Files\Microsoft Visual Studio 10.0\Common7\IDE\devenv.exe.config"
   Note, <configuration> and <runtime> tags are expected to exist in the file. You only need to add the loadFrom... tag inside the <runtime> tag.
   <configuration>
   <runtime>
   <loadFromRemoteSources enabled="true"/>
   </runtime>
   </configuration>
   The next time you open VS, you should be able to see "Git" in the menu bar.
   (Note: the "Git" menu might not appear all the time. However, when you create a solution/project files under the local code repository, and right click on any file to bring up the submenu, you shall be able to see a list of Git commands, which indicates the integration of Git and VS is indeed successful.)
0x01 graphic
  
   Using Visual Studio Git for Windows plug-in
   Accessing available commands
   Use Git menu or right click within solution explorer and select "Git" related menus. Also note yellow, green and red marks appearing in your Solution Explorer and right-click menu will display Git item with a lot of sub-items.
0x01 graphic
   Commit to a Local Repository and Push to the Master one
After you do changes to the code, you can `push' them to the central repository. This is done in a few steps:
- you stage your changes to the stage area of the local repository
   - commit staged changes from the stage area to your local repository
   - `Push' changes from local repository to the central (master) one, so they will become visible to other developers.
0x01 graphic

Your actions will be:
      -- select files you want to promote from the list displayed in the upper left window
      -- press violet `stage' down pointing arrow, files will move to the left bottom window
      -- enter comment in the right bottom window
      -- press either "commit" (if you want to commit to the local repository) or "Commit & Push" button to promote them to the central repository.
   Note, if someone made modifications to files in the central repository, you may get error telling you to do "Pull" first and corresponding window would appear Beside plain Pull it may be `Pull and Merge' and Rebase, and than repeate "Push".
  
   View Pending Changes
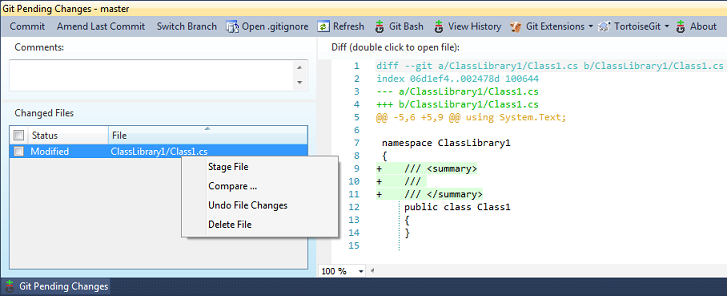
Activated by selecting `Pending Changes' sub-menu of Git menu in VS.
0x01 graphic
    History Viewer
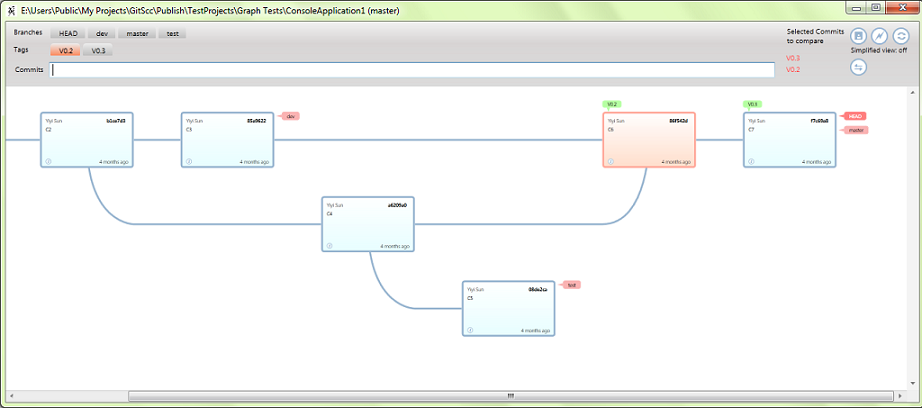
Activated by selecting `History' sub-menu of Git menu in VS.
0x01 graphic
Git Basics
   The Three States
   Now, pay attention. This is the main thing to remember about Git if you want the rest of your learning process to go smoothly. Git has three main states that your files can reside in: committed, modified, and staged. Committed means that the data is safely stored in your local database. Modified means that you have changed the file but have not committed it to your database yet. Staged means that you have marked a modified file in its current version to go into your next commit snapshot.
   This leads us to the three main sections of a Git project: the Git directory, the working directory, and the staging area.

0x01 graphic

  
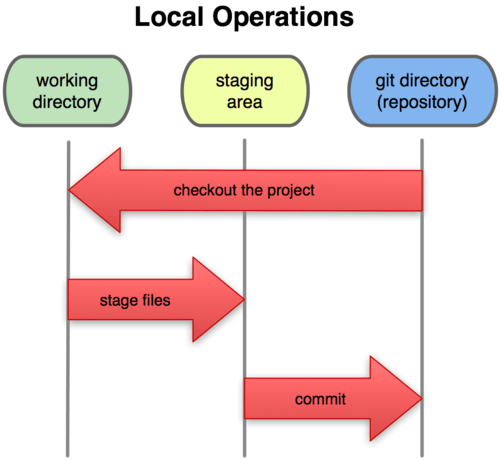
Figure 1-1. Working directory, staging area, and git directory.
   The Git directory is where Git stores the metadata and object database for your project. This is the most important part of Git, and it is what is copied when you clone a repository from another computer.
   The working directory is a single checkout of one version of the project. These files are pulled out of the compressed database in the Git directory and placed on disk for you to use or modify.
   The staging area is a simple file, generally contained in your Git directory, that stores information about what will go into your next commit. It's sometimes referred to as the index, but it's becoming standard to refer to it as the staging area.
   The basic Git workflow goes something like this:
      -- You modify files in your working directory.
      -- You stage the files, adding snapshots of them to your staging area.
      -- You do a commit, which takes the files as they are in the staging area and stores that snapshot permanently to your Git directory.
   If a particular version of a file is in the git directory, it's considered committed. If it's modified but has been added to the staging area, it is staged. And if it was changed since it was checked out but has not been staged, it is modified.
  
   References
      -- Git documentation - local after Git installation:
    User Manual: file://C:\Program Files\Git\doc\git\html\user-manual.html
    Git (Bash) command line reference: file://c:/Program Files\Git\doc\git\html\git.html
      -- Git Basics (tutorial)
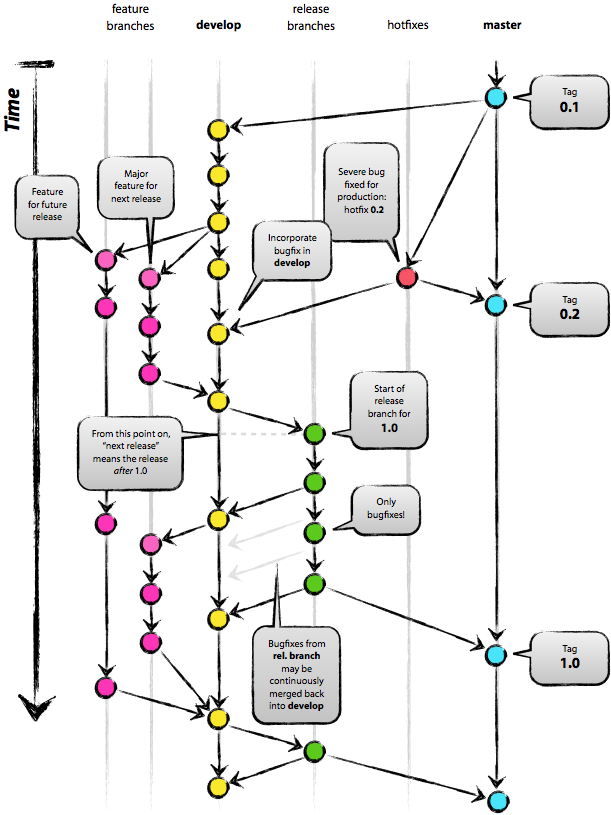
    http://git-scm.com/book/en/Getting-Started-Git-Basics
      -- "A successful git branching model" tutorial
    http://nvie.com/posts/a-successful-git-branching-model/
      -- Git for Windows Wiki:
    https://github.com/msysgit/msysgit/wiki/Frequently-Asked-Questions
      -- Git Extensions 2.47 Manual
    https://git-extensions-documentation.readthedocs.org/en/latest/?
      -- Comparison of Git Extensions and TortoiseGit:
    http://stackoverflow.com/questions/6011893/tortoisegit-vs-git-extensions
  
   Tips
   http://stackoverflow.com/questions/507343/using-git-with-visual-studio , item 25:
   I find that git, working on whole trees as it does, benefits less from ide integration than source control tools that are either file based or follow a checkout-edit-commit pattern. Of course there are instances when it can be nice to click on a button to do some history examination but I don't miss that very much.
   The real must-do is to get your .gitignore file full of the things that shouldn't be in a shared repository. Mine generally contain (amongst other stuff) the following:
   *.vcproj.*.user
   *.ncb
   *.aps
   *.suo
   but this is heavily C++ biased with little or no use of any class wizard style functionality.
   My usage pattern is something like the following.
      -- Code, code, code in VS.
      -- When happy (sensible intermediate point to commit code, switch to git, stage changes and review diffs. If anything's obviously wrong switch back to VS and fix, otherwise commit.
   Any merge, branch, rebase or other fancy SCM stuff is easy to do in git from the command prompt. VS is normally fairly happy with things changing under it, although it can sometimes need to reload some projects if you've altered the project files significantly.
   I find that the usefulness of git outweighs any minor inconvenience of not having full IDE integration but it is, to some extent, a matter of taste.
  
   http://stackoverflow.com/questions/507343/using-git-with-visual-studio, tip 128:
For the most part it's fine - the only problem is when you want to rename a file. Both Git and Visual Studio would rather that they were the one to rename it. I think that renaming it in Visual Studio is the way to go though - just be careful what you do at the Git side afterwards. Although this has been a bit of a pain in the past, I've heard that it actually should be pretty seamless on the Git side, because it can notice that the contents will be mostly the same. (Not entirely the same, usually - you tend to rename a file when you're renaming the class, IME.)
   http://10.193.18.63:8090/display/DSRNG/Connect+to+the+Central+Reposiotory
   When central repository is on Linux box, we need to establish seamless login to it using secure keys.
   •Create keys:
  -- Open a Git Bash
  -- Run "ssh-keygen -t rsa": If asked for password during the key generation, press Enter
  -- Your public key will be under ~/.ssh/id_rsa.pub, where ~ stands for your Home directory (H: drive for most of us)
   • Copy keys to the Linux box. There are few ways how this can be done, simplest is by using Stash:
  -- Login to Stash at http://10.193.12.23:7990
  -- Click on "Manage Account" on the top right
  -- Choose "SSH Keys"
  -- Click on "Add Key" and put your public key here
   If connection is established by using Putty, link below provides helpful instructions:
http://www.tonido.com/blog/index.php/2009/02/20/ssh-without-password-using-putty/#.U0QKbKLye8U Appendix
   Creating Master (Central) Repository
   This can be done using either Git Bash, Git Extensions or Git Gui (may not work for all versions).
   Using Git Bash (accessible through All Programs -> Git -> Git Bash)
   Let's assume you have network directory where your central repository is to reside (\\todnfs04.tsa.bmo.com\Group in our case), mapped as F:, then, the following Bash commands will create central repository in the f:/NVaR/DSRconversion/test/ subdirectory (Bash output is shown in `tabbed' lines):
   $ cd -P F:
   izvoryg@OCDT70390108 /f
   $ cd NVaR/DSRconversion
   izvoryg@OCDT70390108 /f/NVaR/DSRconversion
   $ mkdir test
   izvoryg@OCDT70390108 /f/NVaR/DSRconversion
   $ cd test
   izvoryg@OCDT70390108 /f/NVaR/DSRconversion/test
   $ git init --bare .
   Initialized empty Git repository in f:/NVaR/DSRconversion/test/
   izvoryg@OCDT70390108 /f/NVaR/DSRconversion/test (BARE:master)
   If you don't want it, delete directory with simple "f:/NVaR/DSRconversion> rm -R test" command.
   0x01 graphic
  
   Using Git Extensions (accessible through All Programs -> Git Extensions)
   Basically, the process is the same as described above in the section "Installing Git on Windows", except you select link "Create New Repository".
  
Using Git GUI (accessible through All Programs -> Git -> Git Gui):
      -- Run it and select "Create New Repository" link:
    0x01 graphic
      -- Enter path that is accessible by every developer, say, F:/NVaR/DSRconversion/DSR_Git
    0x01 graphic

    and click "Create" button.
      -- In the opened window enter some comment, say "test Git Installation procedures".
    0x01 graphic
   Creating Local Repository
   The difference to above in Git Extensions and Git Gui is that you select "Clone" instead of "Create" link.
Sample screenshot for Git Gui:
0x01 graphic
   Using Bash process is identical to one described above for the central repository with the following corrections:
  -- Most likely you want your repository be on your hard drive rather than on the network
  -- You omit `--bare' option when issuing "git init" command.
   Instructions for a sample build of NewPlatform for the first time
      -- Clone the central repository into your local one (let's say C:\DSR_Git) as per instructions above
      -- Download and Install NuGet Package Manager from:
    http://visualstudiogallery.msdn.microsoft.com/27077b70-9dad-4c64-adcf-c7cf6bc9970c
      -- Open Solution C:\DSR_Git\NewPlatform\build\Risk.sln
    Go to Visual Studio->Tools-> Nuget Package Manager->Package Manager Console, open it.
    In the bottom console, Run:
    PM> Install-Package Newtonsoft.Json
    PM> Install-Package log4net
    Note: You will get warning if each package is installed already
    You may and likely need to add references to these libs (search in NewPlatform/build/packages directory).
      -- Test a sample solution for the build:
    Open C:\DSR_Git\NewPlatform\build\Risk.sln (if it's not open already)
      -- If it's not unloaded already in the Solution Explorer:
    Click on CalculatorMFL -> Right click on BMO.Risk.Aging -> Unload project
    Run Build. The build should be successful.
    If you haven't unloaded BMO.Risk.Aging, you will get 12 errors for the EqAsianAging.cs file)
   Note on Git Pull-Push conflicts resolution
   From: Zvorygin, Igor
Sent: March 19, 2014 7:11 PM
To: CTD DSR NG Technology
Subject: Tips on Git Pull-Push conflicts resolution (RE: 244 errors in NewPlatform Risk.sln ...)
   Hi
   Offending *.pdb and *.dll files were deleted from the central Git repository along with syntactically incorrect C# files (thanks), but whoever was unlucky in pulling them into their local repository, may still experience problem in pulling and pushing changes from and to central repository.
   Problem shows itself especially dare when you have locally modified files (which is the case for most of us) - Git will complain that you have conflicts that need to be resolved before any such operation can be performed.
   If this happens to you, read this email further, otherwise, you may ignore it, but, may want to save for a later use.
   --------------------
   In short, you have to do the following:
  -- Commit (Save) your changes to the local repository. Refer to Yousef's "GitExt User Guide.doc" or my "Visual Studio and Git integration.doc" on how to do that
  -- Pull latest version of code from the central Git repository.
You will probably get large amount of merge conflicts at this point, below is explained how they can be solved.
If, as a result of the merge, if you get more local changes, you may need to commit them again.
  -- Push your changes to the central repository - which will be simple if you did previous step, or, probably, impossible, if you decided to skip it.
   Below is short description how conflict resolution (merge) is done.
   Once again (pre-requisite) - you do `Pull', it fails, Git suggests you to resolve merge conflicts - see picture below.
   Conflicts will probably come in two varieties:
  -- Binary (DLL and PDB) mismatches
  -- Code files (*.cs, .gitignore, *.sln)
   List of conflicts can be very large (at least that was situation in my case) and expect process to take a while (if you do not want to go through it again in the future - do not check-in build binaries and help you colleagues advising not to do that).
      -- Case one - file (dll) was deleted in the central Git repository, but is still present in your local one - see picture below:
   0x01 graphic
   In that case you can right click on it and menu will appear (you may also simply press `Merge' button).
   Select option "choose remote (theirs)" - i.e. you want to get-promote change (file deletion) from the central repository to a local one.
   0x01 graphic
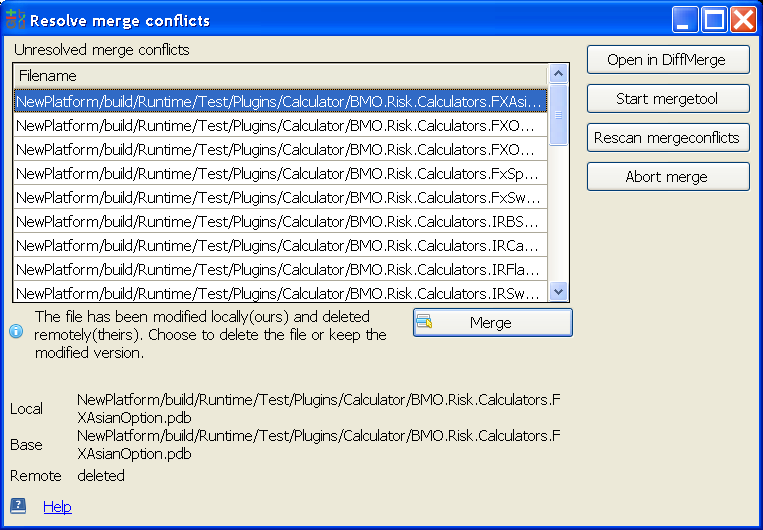
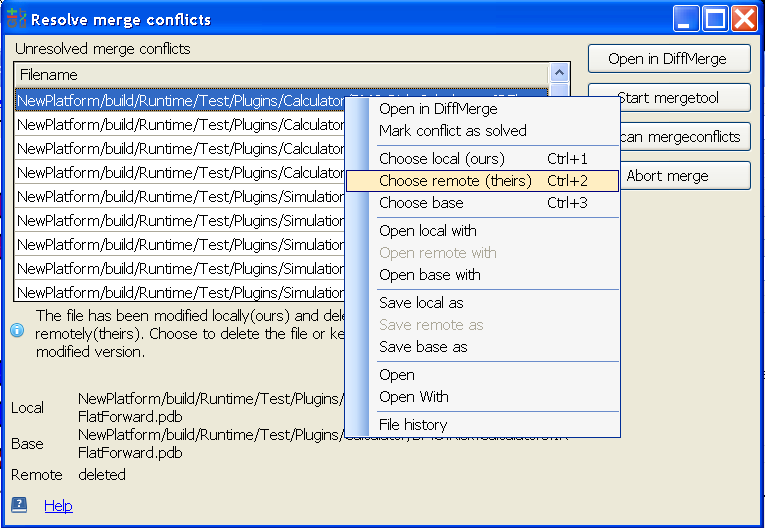
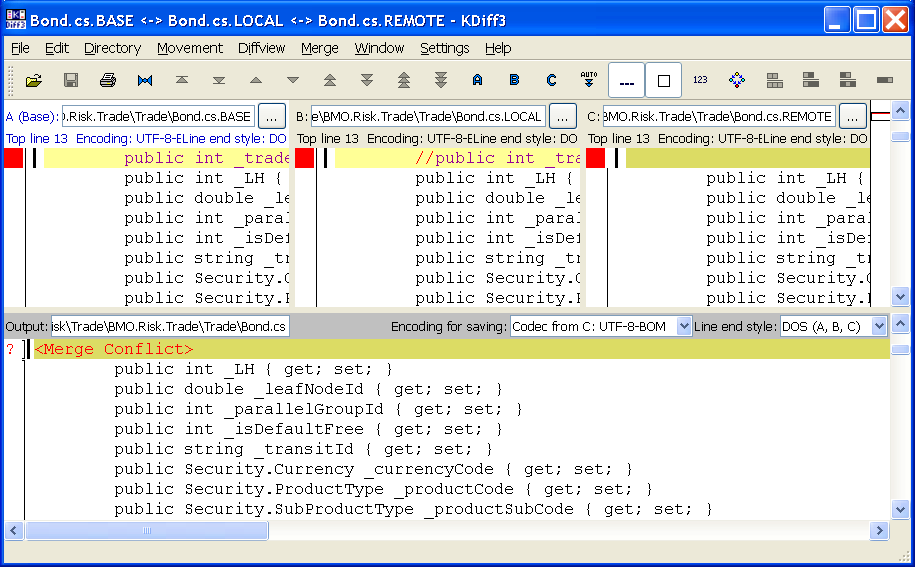
      -- Resolve conflicts in code files.
   Press `kdiff3' (or other merge tool you assigned as a merge tool during Git installation). In case of kdiff3, the following dialogue will open:
   0x01 graphic
   In this dialogue, you see 3 (three) windows showing `base', `local' and `remote' file version. Mostly you will be interested in the last two:
  -- If you want to change something in the `local' (or other) version, you can
  -- Important is to select one of the versions: click `Merge' menu above and select A, B or C, then press `Save'.
   Example:
   In the image above, you see that in my Local version offending line was commented out, in the Remote - deleted, so `C' was selected and saved.
   After all changes are done, dialogue below will pop-up, click `Yes' and you are done with the Pull.
   0x01 graphic
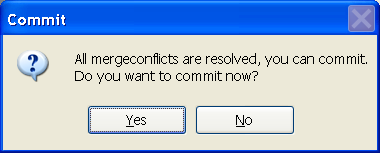
      -- Note, after Merge and Pull completion, you may need to do another `commit' to save locally modified files.
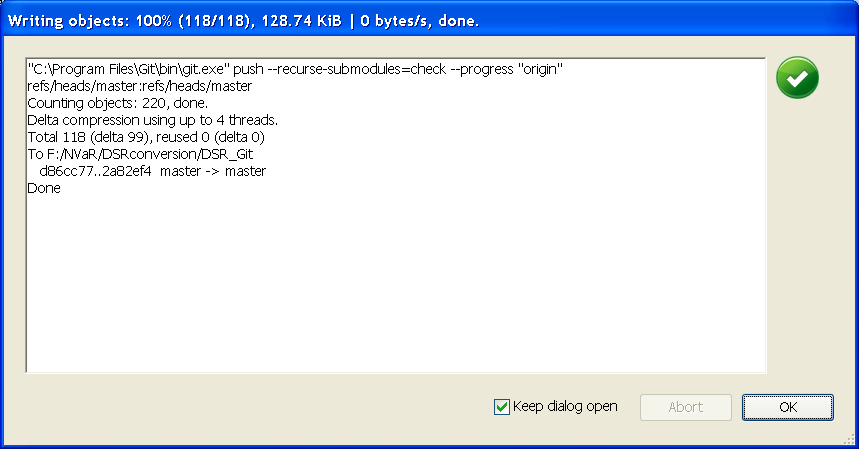
      -- After Pull (or commit), finally, you can Push your changes - done in a standard way (see docs).
    Check that there are no errors in the log - in my case 220 objects were resolved (took a while):
   0x01 graphic

Thanks,
Igor Zvorygin, 416-867-3884
   Diagram from "A successful git branching model" tutorial
   Diagram below shows branches you may want to create in Git. The central repo (origin) holds two main branches with an infinite lifetime:
  -- master - main branch where the source code of HEAD always reflects a production-ready state.
  -- develop - "integration branch", reflects the latest delivered development changes for the next release.
   Besides the main branches master and develop, development model uses a variety of supporting branches to aid parallel development between team members, ease tracking of features, prepare for production releases and to assist in quickly fixing live production problems. These branches always have a limited life time, since they will be removed eventually:
  -- Feature branches - may branch off from: develop, must merge back into: develop
  -- Release branches - may branch off from: develop, must merge back into: develop and master
  -- Hotfix branches - may branch off from: master, must merge back into: develop and master
   0x01 graphic

 Ваша оценка:

Связаться с программистом сайта.

Новые книги авторов СИ, вышедшие из печати:
О.Болдырева "Крадуш. Чужие души" М.Николаев "Вторжение на Землю"

Как попасть в этoт список
Сайт - "Художники" .. || .. Доска об'явлений "Книги"